4.0 IMAGE TO MAP
In IM2MAP mode, the search image window is displayed and
reference points are selected on maps using a digitizer.
The digitizer acts like the reference image window in IM2IM mode.
Sparking points with the digitizer's puck is similar to clicking
on points with the mouse button. IM2MAP specific functions include:
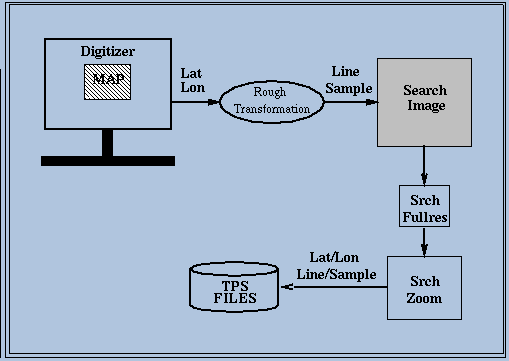
Figure 4.0.1. Image to Map Data Flow
This function allows the user to select which maps will be used in the
TIEPTS session. Map names from an input Map Catalog text file
are selected and saved in a labeled table format Map File for use
in the program. The Show Maps button will not be active until
Select has been pressed, which means that the input search image,
tie point files, and rough transformation have been defined.
A map catalog file must be present. This is an ASCII file generated
from the map warehouse data base. It contains the map name and id, state
abbreviation, center lat/lon, and scale for each available map that falls
within the Lat/Lon range of the search image. The map records
are placed one per line.
When the map catalog file name is accepted, a graphics display of the
maps in the file is displayed over the search image window. The user may
then select All of the map names, or use the first
mouse button to select individual maps by clicking on the map outline in
the search image window. Selected maps will appear filled.
The second mouse button may be used to toggle off/on the map names within
an outline. This is useful when the map names overlay or corrupt the
display of underlying data.
When all desired maps have been selected, clicking Accept
will write the map names to the output labeled table file.
If problems occur while selecting maps or toggling the map names, such as
one click affecting many map outlines, it is probably due to differences
in scale between maps. It may be necessary to edit the Map Catalog
file to remove maps that are of different scale from the rest, and rerun
Show Maps to recreate the Map File.
When all the maps have been selected, the user clicks Accept, and
the map name, corner coordinates, and verify points will be written
to the Map File. This file is later used in
Register to display
information about the selected maps as they are registered to the
digitizer board.
- Map Catalog
- This button displays a "File Selector" panel containing a
list of (*.txt) files in the current directory from which the existing
catalog file may be selected.
- Map File
- This button displays a "File Selector" panel containing a
list of (*.map) files in the current directory from which an existing
map file may be selected. Any newly selected maps will be appended to
this file. If a new map file is to be defined, the name must
be entered in the Map File text item, ie., it cannot be
entered in the Selection field of the "File Selector" panel.
- Map Color
- This button displays a color palette for selection of the
color in which the maps will be drawn. The default color is green.
- Map Name
- These radio buttons toggle the display of all the map names
(the second mouse button is used to toggle individual map names).
This is useful when the map names overlay or corrupt the
display of underlying data.
- Accept
- This button closes the panel and writes any selected
map names to the Map File.
- All
- This button closes the panel and writes all the map names
in Map Catalog to the Map File.
- Cancel
- This button closes the panel. Nothing is written to Map File.
Map registration is the process of identifying the geographic area
of a map, and where it resides in digitizer coordinates. Map
registration is completed in two phases:
- Map Parameters
- Map Registration
When Register is clicked, the Map Parameters panel
appears. This panel is used to select a specific map from the map
file, make any modifications to the information concerning that map,
and then register the map to the digitizer.
- Map File
- This button displays a File Selector panel for
selecting an existing map file. The default is the name of the
map file created in the Select Available Maps panel.
As in that panel, if a new map file is to be defined, the filename must
be entered directly in the Map File text item,
and the user is then responsible for
entering all of the required information for each map name specified.
- Map ID
- This button provides a Selection panel listing the
ID fields of all maps defined in the current Map File.
When a map ID is selected, the rest of the fields in the
Map File are retrieved and placed in the appropriate fields
in this panel. If a new map is to be defined, the ID must be entered directly
in the text item.
- Map Scale
- This menu/text item defines the scale of
the map to be registered. Selecting a scale from the option
menu will update the text item. If the scale is unique, it
may be entered directly into the text item in the format 1:XXXXXXX.
- Map Type
- This text field defines the map's type. The
type may be selected from the option menu or typed
directly in the text item. The map type has no bearing on
the map's registration and is only for documentation purposes.
- Map Date
- Map Datum
- Map Description
- These text fields are only for documentation purposes and
their definition is optional.
- Coordinate Type
- This option menu defines the coordinate system
used for defining the geographic area of a map. By default,
the type is Geographic (i.e., Lat/Lon). If
the map is defined to be of another type, or the user desires another
type, User Defined(X,Y) is also supported.
- Upper Left:
- These text items define the X and Y coordinates of the upper left
point on the map. If the Coordinate Type is
Geographic, the Lower Right
and Verify Pt will be calculated and their
values placed in the respective text items. The format for
latitude is +DD MM SS.SS, and the format for longitude is +DDD MM SS.SS.
- Lower Right:
- These text items define the X and Y coordinates of the lower right
point on the map. The format for
latitude is +DD MM SS.SS, and the format for longitude is +DDD MM SS.SS.
- Verify Pt:
- These text items define the X and Y coordinates of the verification point
on the map. The format for latitude is +DD MM SS.SS,
and the format for longitude is +DDD MM SS.SS.
- Number Pts X:
- Number Pts Y:
- These text items define the number of points to be sparked
on the digitizer along each of the respective axes in order to
register the map. These values may be confusing since the
total number of points to be sparked is Number Pts X * Number Pts Y.
For instance, if 3 points are to be sparked along
the X axis, and 2 along the Y axis, 3*2 = 6 points will be
sparked on the digitizer to register the map.
- The default (2,2) specifies that 4 points (2*2 = 4) will be
sparked to register the map. Note that the Verify Pt
is always sparked in addition to the X and Y points. These values
also determine the value of the order of the polynomial used in the
Transformation . If Number Pts X * Number Pts Y
is less than
7, the transformation will be calculated using a first order polynomial,
otherwise, a second order polynomial will be used.
- Save Map
- This button closes the panel and updates the Map File
with the entered/modified parameters. This option may be useful if the
file is to be created or modified, but the map is not to be
registered at this time.
- Register
- This button closes the panel, updates
the Map File, and displays the Map Registration Residuals
panel for registration of the map.
- Cancel
- This button closes the panel; all updates to the current map entry
are lost. Updates to previously processed maps are retained.
Once the parameters for the map are properly defined, the user presses
the Register button. The Map Registration Residuals
panel will appear, requesting that specific coordinates be sparked on
the digitizer. The final point requested is the verification point.
Once it is selected, all the sparked points, excluding the verification,
are fit into the transformation polynomial and the residuals for each point
are displayed in the scrollable text list.
If a certain point seems to have a high residual, it may have been
poorly sparked. To respark a point, select that point item in
the text list by clicking on it (the text line becomes highlighted),
and respark the respective point on the digitizer. The newly
sparked point will replace the original, then all the points will be
refit to the transformation and the resulting residuals displayed. The
next point in the text list will automatically be highlighted and may be
resparked if necessary, or another point may be selected and
resparked until the fit is adequate. Once the fit is adequate,
press Accept to register the map. The
Cancel button may be used to close the panel
without registering the map.
Once the map is registered to the digitizer, the user selects an
easily identifiable point on the map and sparks it. The search
full resolution window will be automatically created/updated. The
user selects a point in that window, and the search zoom window is
created/updated. The user selects a point in the zoom window, and the
Accept/Reject Selected Point panel appears.
The user continues to Register maps from the map file
and select corresponding points on the map and in the search windows until
all maps have been processed or the residuals of selected points
are consistently low.
A manual capability exists for users who do not have a digitizer board,
or where no maps are available but coordinates of likely tie points are
known. In this mode, the Show Maps and Register options are
disabled. The user enters the point coordinates in the Manual Entry
panel, and clicks the Spark button. The values may be input in
Geographic (DDD MM SS.SS) or User Defined (DDD.DD) format (
no other user-defined formats are allowed at this time).